Arduino Delphi Serial Communication With Arduino Board
Destiny G.: Hello my team is interested in adding lights to our robot using an Arduino Leonardo++. I have looked around on how to get the Roborio and Arduino to communicate and I got a variety of answers such as analog, I²C, and serial. But I couldn’t find anything on how to actually wire it up. Can you please help. As a project over the summer I used the I2C bus on the RoboRio to send commands to an Arduino UNO (wired via I2C ports on the UNO) which drove a strip of LEDs based on the command sent. The I2C class in WPILib is fairly straightforward, and the is even easier to use. The I2C pins on the Leonardo are 2 (SDA) and 3 (SCL).
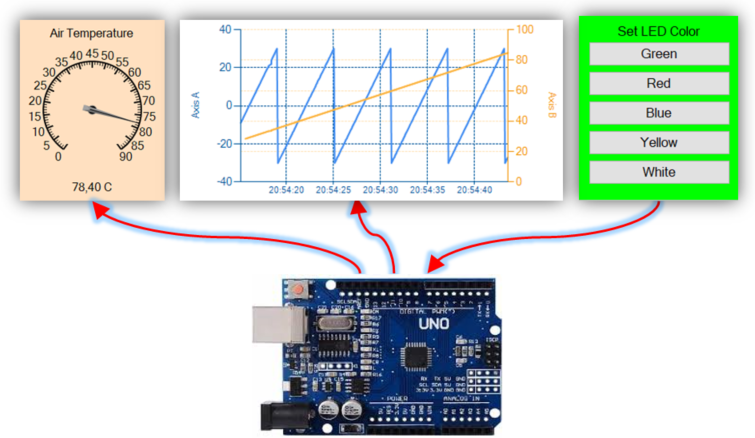
The Arduino is plug into the USB port of TP-LINK TL-WR1043ND allow the router to control the Arduino. FTDI USB Serial Device converter is attached to ttyUSB0 as shown in figure below. Start socat manually (Arduino Uno R3 USB chip). Here I develop a program using Delphi called Arduino Control System.
Connect these, the 3.3v and the ground pins from the Arduino to the I2C port on the Rio and you are all set. I used on the Rio’s side to send the commands. It uses 1 integer as the data, and each of the 8 bits in the integer represent a state of the robot that I wish to reflect in the LEDs. For example, if the robot is on the blue alliance, it will enable the 0th bit (least significant bit), and if the robot is in teleop, it will enable to 1st bit.
The Arduino code simply catches the data integer and checks each bit, and tells the LEDs how to behave based on the parameters we have sent it. I chose to send 1 integer of data because it was pretty straightforward, however, you can send multiple variables or stings of text over the I2C line, but it would be more difficult on both ends to program. Hope this helps. I actually got code on the Rio working so that we could have it communicate with an Uno using serial over just a USB cable. This method is very simple, as the Arduino can both be powered by and communicate with the Rio using only one cable. Are you using the Leonardo++ from a past KoP?
I had some issues using it, I could never quite figure out why though. I opted for using an Uno instead (I had plenty at home that we could have used). On the Arduino side, I just had it poll the serial buffer until something came in. Once the Rio sent it something, I had the Uno interpret that as some pre-defined sequence (for example, sending “B” made all of the LED strips turn blue). Let me know if you were at all interested in seeing either the Arduino or Rio code.
What language is your team using for your bot? We are a C++ team, but I’m sure it would function just as well on the Java side. Below is a link to the WPILib documentation on the SerialPort class that I used on the Rio. Game god of war 2 pc tanpa emulator. Powered by, best viewed with JavaScript enabled.
> > Software Serial > SoftwareSerialExample Software Serial Example Arduino and Genuino boards have built in support for serial communication on pins 0 and 1, but what if you need more serial ports? The has been developed to allow serial communication to take place on the other digital pins of your boards, using software to replicate the functionality of the hardwired RX and TX lines. This can be extremely helpful when the need arises to communicate with two serial enabled devices, or to talk with just one device while leaving the main serial port open for debugging purpose. In the example below, digital pins 10 and 11 on your Arduino or Genuino boards are used as virtual RX and TX serial lines. The virtual RX pin is set up to listen for anything coming in on via the main serial line, and to then echo that data out the virtual TX line. Conversely, anything received on the virtual RX is sent out over the hardware TX.